Monday, 7 March 2011

Coffee addiction


Anyone who knows me might know by now that I have become a huge coffee junkie. The problem is, it's so hard to find good coffee in London unless you know some coffee guru..It's understandable, in a place where there is such a huge tea culture but it's hard for caffeine addicts who look for something better than average.
This is why Y. and I have been on a quest lately to discover the best coffee places in London and compare their signature drinks. I can so far say that these trips have been going exceptionally well and there are some amazing gems we have found (along with hundreds of other people I suspect) so I will be very soon posting about exploring all these coffee havens - and of course how we are trying to reach perfection in creating a stumpy at home (apologies to the neighbours for the espresso machine vibration and noise).

Greek cravings part 2 - a vegetarian's paradise

Here is a family recipe for Spanakopita (Spinach and feta pie) which must always and only be made with the freshest ingredients. I especially love the smell coming out of the oven while it is being baked and it's great for vegetarians, as a starter dish or as a main really. I will not specify the amount needed for each ingredient for this one, as it's up to one's taste and it really doesn't matter - just add as much of the freshest herbs as you have, and you're in for something yummy:

Spanakopita:

Filo pastry (you can make your own, but I opted for ready made due to time restrictions)
Olive oil
Fresh spinach (at least one large bag)
Parsley (at least one large bag)
Dill (at least two small bags)
Leeks (2-3) or spring onions (4-5)
Feta cheese (around 500 gr), crumbled


Preheat the oven to 180 degrees.
Roll out several layers of the filo pastry on a large baking tray and brush them with olive oil.


Add on top all the chopped wild greens / herbs and the crumbled feta cheese. Sprinkle with plenty of olive oil (always extra virgin).


Cover with another several layers of filo pastry, brushing them again with olive oil.
Tuck in the edges and put in the oven. 


Bake for about 1 hour, or until the pastry is crisp and golden.


We accompanied with some feta cheese and pepper spread: Mix feta with one green chilly pepper and a tbsp of olive oil and beat with an electric mixer. When the mixture is creamy but still chunky, it's ready.
Don't overwork it, it just needs one minute as it shouldn't be too liquid. In any case, putting it in the fridge will firm it up.

Τυροκαυτερή

And the lovely book by Tessa Kiros..


Greek cravings

I haven't posted anything in such a long time, I have no excuse for it, except for the "I have been busy" factor, but still, it's no excuse. I wish I could be a full-time blogger but for the time being I have a day job that is eating up all my time quite sadly so I need to catch up with posting! All this time I have been thinking of what I'd like to post, I have been taking pictures of everything I've made and I have been considering improving my photographic skills so that the pictures I post here make more justice to the yummy things and present them in a more stylish kind of way. I still haven't made any progress on this though so for the time being we're going to just settle for my regular photography and focus more on the taste.

Being away from home I get homesick quite a lot, every time for different reasons: My family and friends, the weather, expressing my opinions in my mother tongue (they make a lot more sense), the sea. And of course, food! There are times when I really crave for something homemade, and when I say homemade I don't just mean made at home, I mean made at home by mum or grandma, the way they have been making it for many years. Sometimes, it's just anything Greek, something that perhaps I would order if I went to my local taverna there. Anyway, I often try to reconstruct a "Greek kitchen" situation  at home and prepare my favourite dishes and although I must say that I'm doing pretty well, they just never quite taste the same. Maybe it's the climate, the weather over here asks for heavier stuff, like stews or soups (funnily enough ever since moving here I have become an addict to bread, which is turning out to be a very bad thing for me) . Or the ingredients, although I try to buy the best (and I am most grateful for finding almost anything from all over the world, brought to me fresh) but it's just not the same as getting them from your allotment. Finally, the fact they these dishes were born in another country is not a coincidence. They were conceived and created there, so there is where they taste right.

Last week I had one of those days and I started flipping through Tessa Kiros' book "Food from Many Greek Kitchens". I highly recommend the book, especially for non Greeks, as it's a wonderful and colourful mixture of greek recipes with some anecdotes and local wisdom. I'm going to be honest and say that I was sceptical about buying it (or, in fact, buying any greek cookery book written by someone who hasn't actually lived in the country) as I always think "I'm sure I can do better that them" with Greek recipes. But I was pleasantly surprised to see that the recipes are very loyal to the original ones I know, very close to the roots and some of them, well, as if they were dictated by my granny!

Here are a couple of the things I made, I hope you will find some inspiration from them!

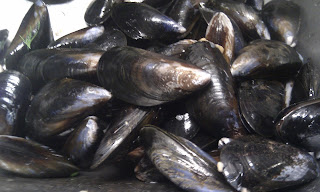
Mydopilafo - Mussel Rice (adapted from Tessa Kiros' recipe):

1,5 Kg mussels
6 tbsps olive oil
3 garlic cloves: 1 whole, 2 chopped
2-3 flat leaf parsley stalks with the leaves on
125 ml white wine
180 gr spring onions, chopped
4 tbsps dill, coarsely chopped
3 tbsps ouzo
2 tomatoes, grated on the large holes of a grater (so that the skin stays behind in your hand)
400 gr long grain rice

De-beard the mussels and scrub them under running water. Drain and discard any broken mussels, or those that stay open.


Heat 2 tbsps of the oil in a large pot (large enough to hold the mussels).

Add the whole garlic and after a couple of minutes, add the drained mussels, parsley and white wine.
Put over high heat and cook covered, until the mussels open.


When all the mussels have opened , remove from the heat and strain, keeping the liquid.
When cool enough, remove half of the mussels from their shells. Keep aside.

Heat the rest of the oil in a wide pot. Add the onion and saute on a low heat until soft and golden.
Stir in the chopped garlic cloves and half of the dill and after 1-2 minutes, add the ouzo ( I added more than specified above as I love its anisey flavour on seafood) and cook until it evaporates.


Then add the tomato.


 Increase the heat to medium and simmer for a few minutes, then add the rice, turning it through to coat well.

Make the mussel broth up to 1 litre by adding to it hot water and add to the pot with the rice. Bring to the boil, lower the heat and simmer for about 10 minutes until a lot of the liquid has been absorbed. Add all the mussels, turn through and simmer for another 5 minutes, making sure that nothing sticks to the bottom of the pot.


Remove from the heat, add some more dill and fluff up the rice. Cover the pot with a clean tea-towel and then put the lid back on and leave for another 10 minutes to steam and finish cooking.


Sunday, 23 January 2011

Tarte Tatin - La tarte des demoiselles Tatin

My mum called me a few minutes ago asking me for the tarte Tatin recipe I made during Christmas. It was gone in 30 minutes and I must say that my sister, S. helped me make it. Not that it's difficult but she wanted to practice.
On that day I realised what a difference a good oven can make. Mine over here struggles and is not very powerful so my crusts and pastries don't come out as they're supposed to. Anyway, here goes:

Ingredients:

5-6 large apples, preferably Golden Delicious or Ginger Gold peeled and quartered
Juice of 1 lemon
1 ½ cups granulated sugar
6 tbs unsalted butter, divided
For the pâte brisée (shortcrust pastry):
2 1/2 cups all-purpose flour
1 teaspoon salt
1 teaspoon sugar
1 cup (2 sticks) unsalted butter, chilled and cut into small pieces
1/4 to 1/2 cup ice water

To make the dough (pâte brisée:):
-Combine the flour, salt and sugar in a bowl or food processor. Add the butter and process until the mixture resembles coarse crumbles.
Add ice water slowly, until the mixture holds together without being too wet or too sticky.
Make the dough into a ball and refrigerate for at least an hour.

-Toss the apple quarters in a bowl with the sugar and the lemon juice.
Melt 4 tablespoons of butter on a 28 cm skillet / pan over medium heat.
Add the remaining cup of sugar along with a few tablespoons of the apple-lemon juices.
Cook the mixture over medium-low heat, stirring regularly with a wooden spoon, for about 15 minutes, or until the mixture is a smooth, bubbly, pale caramel color.
-Remove the pan from the heat and carefully add apple quarters, arranging them rounded-side-down in a decorative pattern. Arrange a second layer of apples on top wherever they fit, closely packed. This second layer need not be terribly neat. Top the apples with the remaining 2 tablespoons of butter, cut into dice.
-Preheat the oven to 180 degrees.
-Cook the apples over medium-low heat for about 20 minutes, occasionally spooning the bubbling caramel liquid over them. Press them down gently with the back of a spoon — don’t worry if they shift a bit in the liquid; just move them back to where they were — and watch to make sure that no one area of the pan is bubbling more than another. Shift the pan as necessary so that the apples cook evenly. They are ready when the liquid in the pan has turned to a thick, amber ooze. The apples should still be slightly firm. Do not allow them to get entirely soft or the liquid to turn dark brown. Remove the pan from the heat.
-Remove the dough from the refrigerator. Knead and roll it making a circle as large as the skillet where the apples have been cooked (28 cm diameter). Carefully lay the pastry circle over the apples in the skillet, tucking the overlap down between the apples and the inside of the pan.
-Place the skillet on a rimmed baking sheet, and bake for about 30-35 minutes, until the pastry is dry and golden brown. Remove the skillet from the oven, and let it to rest for a minute or two. Tilt the pan and look down inside the edge: if there is a lot of juice, pour most of it off into the sink. Place a serving platter upside-down over the skillet and, working quickly and carefully (
it’s hot!), invert the tart onto the platter. Rearrange any apple slices that may have slipped or stuck to the skillet. Serve warm or at room temperature, preferably with cream.


Sunday, 16 January 2011

Boeuf Bourguignon traditionnel

This year I offered to make the main course for the New Year's Eve dinner so it had to be something meaty, something hearty, more or less traditional and something that would please everyone (tough task, especially if your grandparents are attending). So Boeuf Bourguignon it was. The traditional and long recipe. Long in both time and description but don't be put off because the biggest part of the time is for the marinade and the level of difficulty is not at all high. In any case, it's totally worth it but would recommend it if you're cooking for a feast (I'm personally not up to marinading and slow-cooking something for hours in order to eat it on my own).

Ingredients for 8:

-2 kg lean braising beef
-250 gr bacon
-1,5 lit red wine
-35 small onions
-4 carrots
-400 gr small mushrooms
-150 gr butter (real cow butter if possible and not margarine)
-1 large onion
-3 shallots
-1 spring of thyme
-2 bay leaves
-3 springs of flat-leaf parsley
-2 tbsp olive oil
-1 tbsp flour
-2 garlic cloves, peeled and crushed
-80 ml strong alcohol such as cognac
-1/2 lemon juice
-salt, pepper

Preparing the marinade:
-Peel and slice the onion and the shallots (ok, you can use just onions or just shallots)
-Peel and slice the carrots.
-Make a bouquet garni with the thyme, bay leaf and parsley
-Cut the meat in cubes and place in a large bowl
-Add 2 tbsp of olive oil and the red wine. Mix well.
-Add the strong alcohol, pepper, the bouquet garni, the diced shallots and onion and the carrots and mix well.
-After making sure that the meat is covered by the marinade, cover the bowl with cling film and leave for 18 hours in the fridge.


Main cooking:

-Remove the meat cubes from the marinade, drain and dry on kitchen paper. Do not discard the marinade! Keep it to use in the following steps.
-Melt 75 gr of the butter in a pan on a strong heat. Brown the meat cubes in the pan for 3-4 minutes each side. It's better to brown a small amount of meat each time and then repeat. This frying / browning is very important as it will make the meat to not disintegrate during the long hours of cooking.


-Keep the meat pieces in a drain rack and reserve the frying liquid.
-Sieve the marinade and reserve the liquid. Reserve the carrots, onions/shallots separately. Keep the bouquet garni aside but do not discard either!
-Heat another 25 gr of the butter in a casserole.
-Add the onion and the shallots and the carrots that you have reserved from the marinade and leave for 2 minutes.
-Add the meat pieces and sprinkle with 1 tbsp of flour.
-Mix well and turn over the meat cubes.


-Add the liquid where the meat was cooked / browned, the garlic cloves and the marinade liquid (so basically, the wine) so that the meat is covered. If you don't have enough wine/marinade liquid, add beef stock but most likely you will have enough.
-Bring to a boil and leave to simmer for 2-3 minutes.


-Add the bouquet garni, place (covered) in the oven on a slow heat and leave to cook for 2 hours. Open from time to time to skim off any scum


Preparing the accompanying vegetables ("la garniture"):

-Remove any grind from the bacon and dice
-Peel the 35 small onion
-Melt the rest of the butter (50 gr) in a small casserole over medium heat.
-Fry the bacon pieces for 5 minutes.
-Add the small onions  and cook covered for 10 minutes or until golden but not brown.
-Remove the onions and the bacon and place the mushrooms (which you have previously sprinkled with the lemon juice to avoid them turning brown) now in the casserole. Leave for 5 minutes, mixing. Remove from the casserole.
-Mix together the bacon, small onions and mushrooms and add them to the casserole with the meat.
-Cook for 30 minutes and before removing from the heat, uncover for a couple of minutes so that the sauce is reduced in a good consistency.
-Serve!


There are 2 other recipes for Boeuf Bourguignon that I own, one from Julia Child and an alternative and they both skip the marinade but the taste the meat absorbs after 18 hours in red wine is just irresistible.

Phew, bon appetit mes amis!

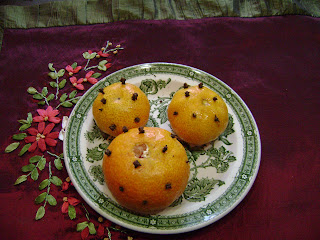
Clementine Liqueur - so much better that Limoncello!

First of all, I want to say that this recipe is Giota's, who is almost like a member of the family, and I want to thank her for the effort she took and the lovely pictures! I wish I could take such beautifully styled pictures myself when I cook.

Here is the list of ingredients you will need:

-10 clementines
-10 cloves
-700 ml cognac or any clear, strong alcoholic drink such as Tsipouro if you're Greek or Orujo if you're Spanish.
-1 1/2 cups sugar
-1 1/2 cups water

Choose 10 big firm but ripe clementines.


Wash them, drain them and pierce each with one clove.


Put in a large glass jar / container.
Add the cognac or any other strong, clear alcoholic drink you're using and seal. Leave in a cool, dry place for 20 days (it's worth the wait).


After the 20 days, boil the water with the sugar for 2-3 minutes, making a syrup. Allow it to cool.
Strain the alcohol from the clementines and add with the syrup which has now cooled.
Sieve the liqueur so that the liquid is clear and put in a glass bottle that seals well with a lid.
Leave for two weeks before serving and serve it chilled.
In some restaurants they traditionally serve it as an after dinner digestive but my friend and I had a bottle without having had any dinner - and we didn't even get drunk. Enjoy!

Raspberry Jam

Over the Christmas holidays I learned and witnessed lots of recipes from family and friends. This time of the year is besides known for the feasts and over-eating which then leads you to start the new year with indigestion and vows that you'll eat only vegetables for the next month. I broke mine a week ago and that was actually a personal record. But of course I did enjoy the foods I ate, even the tips from my grandmother, mum and family friends. And the sweets, oh the sweets....
I now have a rich collection of recipes (with pictures and everything) that could cover a month's time posting one each day on the blog but I've got to take it easy. And I've been so busy with work and other "serious" stuff that I sort of neglected the blog but I'm now back with 3 recipes: Jam, Boeuf Bourguignon and Clementine Liqueur.
Here goes the jam:

For any of you whose native language is not English, you might wonder (as I did) what is the difference between jam, jelly, marmalade and conserve. The differences are the following:
Jam is fruit cooked with sugar over high heat until set. The simplest of them all, the classic one.
Conserves are pretty much like jams but contain large pieces of fruit or whole fruits. The fruits are steeped in sugar before cooking to firm them up and they are boiled more gently than jam.
Jellies are made from the strained juice of fruit, thus do not contain any fruit pieces - that's an easy one to remember.
Marmalade is made in the same way as jam but with citrus fruit, which, by the way, require a long preliminary cooking period first to soften the peel.

Instead of using only one kind of berry, you can mix as many berry varieties as you want. The first time, I mixed raspberries (mainly) and blackberries but this time I only used raspberries.
You will need 450 gr of fruit
450 gr (or less, depending how sweet you want it) granulated sugar. I use about 1/3 less so the jam has a fruitier taste and is not sickly sweet.
Juice of 2 lemons

-Put the fruit and the juice of the two lemons in a large pan and lightly crush it with the back of a wooden spoon.

-Add the sugar and heat gently, stirring until the sugar has dissolved.


-Turn up the heat and bring to the boil. When the jam reaches a rolling boil, cook for 5-10 more minutes and test for a set. This is done by putting a plate or saucer in the fridge before you make the jam. When you think that your jam has reached a set, put 1 tsp of boiling jam on the chilled saucer, allow to cool and then push it from one side with your finger. If your finger leaves a trail on the plate and the jam wrinkles slightly, it is set. If it doesn't, return the pan on the heat and boil from one more minute, then test again and so on until it's set.


-Remove any scum from the surface with a skimmer or slotted spoon. Leave the jam to cool slightly so that a thin skin forms on the surface, then ladle into a warm, sterilized jar. Store in a cool, dry place and refrigerate after opening.


I even ate it on bread while it was still hot and runny!