Monday 5 December 2011

Cookies: Chocolate Chip & Walnut, Oatmeal & Raisin, Matcha Shortbread


Remember yesterday's post where I mentioned that I had cookie dough resting in the fridge overnight? 4 kinds of cookie dough, to be exact. They are all baked into nice crunchy, chewy little cookies (some not so little) now and put into little bags to be given away tomorrow (I hope none of the recipients will read before I give these). But first things first.


We're only a few weeks before Christmas and things that need to be done/shopped are accumulating. This morning I had to run some errands and do some light Christmas shopping so we took the opportunity to pass by Lantana before and have some breakfast before braving the insane crowd of Oxford Street.
I love going there and it's so handily located near all the shops but at the same time off the noise and insanity. The only thing that bothers me is that it's becoming increasingly popular and the waiting queues are becoming longer every time. Anywho we couldn't wait too long so compromised and said "yes" when the waiter asked us if we minded sitting outside. BIG MISTAKE. The food was delicious as always but I ended up frozen and not feeling my extremities.
Things eaten:
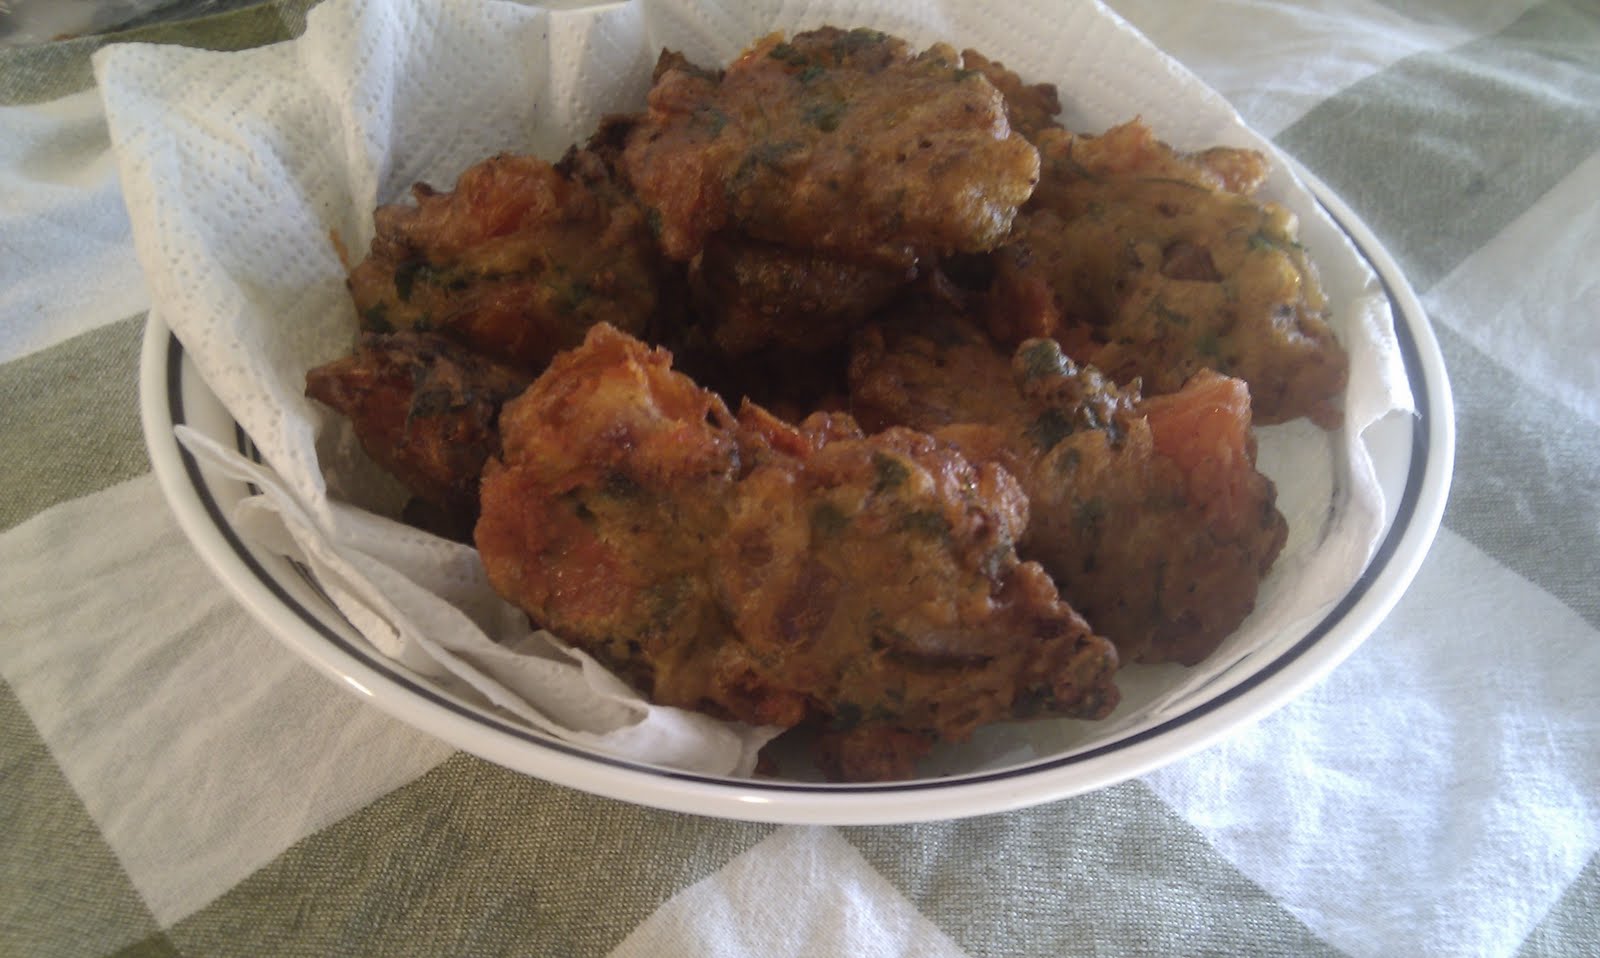
Corn Fritters (aka corn fritters, bacon, roasted tomatoes, rocket, chili tomato chutney, creme fraiche)


The Brat (aka sourdough bread, bacon, rocket, aioli and tomato chutney)


A few hours later I was home and ready to bake all the cookies I was chilling since last night.
I finished off the Coconut ones which I had started the night before and left them to cool while doing the others. The other three where:

Salted butter chocolate chip & walnut cookies: always a winner. I've tried many chocolate chip cookie recipes, some chewier, some crunchier, some sweeter, some nuttier, but this one is my favourite so far. It has the right texture (not too chewy but not to crispy either), the right amount of sugar, the right amount of butter so it will not overshadow the other flavours and lastly but most important of all: salted butter (just to make things even healthier, huh?). 

Oatmeal & Raisin cookies: I love these dipped in coffee. A bit on the healthier side but still incredibly tasty.

Matcha Shortbread cookies: These were my favourites. Perhaps due to the fact that they have a nice green colour which is pretty unusual for a biscuit, or maybe because it was my first-time experiment and they turned out to be quite yummy. I'm sure you know it but just in case you don't, Matcha is green tea powder and can be found in Japanese shops (for those who live in London: try Japan Centre on Regent street, as per my friend Kiyeun's advice.)

Shall we pass on to the recipes?

Salted Butter Chocolate Chip & Walnut cookies (makes about 24 but you can halve the recipe and make a dozen)

Ingredients

110g dark or light brown sugar
100g granulated sugar
1 large egg, at room temperature
1/2 teaspoon vanilla extract
180g flour
1/2 teaspoon baking soda
1/2 teaspoon flaky sea salt or kosher salt
200g coarsely chopped bittersweet or semisweet chocolate or chocolate chips
1 cup toasted nuts, coarsely chopped. I like walnuts with my chocolate chip.

115g salted butter, at room temperature. I used the one with sea crystals 

Method:
In the bowl of a stand mixer, or by hand, beat the butter, brown sugar, and granulated sugar just until smooth and creamy.

Beat in the egg and the vanilla.
In a small bowl, whisk together the flour, baking soda, and salt.
Stir the flour mixture into the beaten butter until combined, then mix in the chopped chocolate (including any chocolate dust) and the chopped nuts.
Cover and chill the batter until firm. (It’s preferable to let it rest overnight.)
To bake the cookies, preheat the oven to 160ºC. Line two baking sheets with parchment paper or silicone baking mats.
Form the cookie dough into rounds about the size of a large unshelled walnut. Place the mounds evenly spaced apart on the baking sheets, and press down the tops to flatten them so they are no longer domed and the dough is even.
Bake the cookies for ten minutes, rotating the baking sheet midway during baking, until the cookies look about set, but are not browned.
Remove from the oven and quickly tap the top of each with a spatula, then return to the oven for two to five more minutes, until the tops of the cookies are light golden brown.
Remove from oven and let cookies cool.


Oatmeal and Raisin Cookies (makes about 24 but you can halve the recipe)

Ingredients


225 g unsalted butter, at room temperature
150 g granulated sugar
200 g packed light brown sugar
2 large eggs, at room temperature
245 g flour
1 teaspoon baking soda
1 teaspoon sea salt
1/4 teaspoon nutmeg
1 teaspoon ground cinnamon
175 g rolled oats
240 g raisins
Method:

-In the bowl of a stand mixer, beat the butter and sugars until very light and fluffy.

-Meanwhile in a separate bowl, whisk together the flour, baking soda, salt, nutmeg, and cinnamon, making sure there are no lumps of baking soda. Stir in the oats and raisins.


-Add the eggs, one at a time, and beat until thoroughly combined. On low speed, or by hand, gradually add the flour and oat mixture to the creamed butter, mixing until completely incorporated.
-Chill the batter a few hours or overnight, covered. (This step is optional, although recommended by the author of the recipe.)
-To bake the cookies, preheat the oven to160ºC. Line a baking sheet with parchment paper or a silicone baking mat.
-Drop the dough in 50 g balls evenly spaced on the baking sheet and flatten the tops slightly with your hand.
-Midway during baking, rotate the baking sheet and tap the tops of the cookies down somewhat firmly with a spatula to flatten the domes.


-Bake the cookies for 20 to 22 minutes, until they just start to turn brown across the top, but do not overbake.
Remove from oven and cool completely.


Matcha Shortbread Cookies

Ingredients:
100 grams good-quality butter, softened (I use semi-salted butter; if you use unsalted, add 1/4 teaspoon sea salt)
50 grams confectioner's (or icing) sugar
1 egg yolk
90 grams flour
40 grams finely ground almonds(a.k.a. almond meal)
2 teaspoons matcha (green tea powder)
2 tablespoons sugar, preferably an unrefined cane sugar in coarse crystals, such as turbinado or demerara

Method:

In a medium mixing-bowl, cream together the butter and confectioner's sugar with a spatula. Add the egg yolk and mix it in thoroughly.

In another bowl, combine the flour, ground almonds, and matcha, and stir with a whisk to remove any lump. 

Add to the first bowl and stir it in until the mixture comes together to form a ball; don't overwork the dough. 

Roll it into a log with a circular or square section, about 4-cm in width. Wrap in cling film and place in the freezer to firm up for 40 minutes (or in the fridge for 2 hours).

Preheat the oven to 160° C and line a baking sheet with parchment paper. Sprinkle the sugar on a plate and roll the log in it to coat on all sides, pressing it down a bit into the sugar if necessary. Using a sharp knife, cut the log into 1-cm slices and arrange on the prepared baking sheet; the cookies will spread just a touch.

Slip into the oven and bake for 12 minutes, or until the cookies just begin to turn golden at the edges. Let rest for 5 minutes on the baking sheet before transferring to a rack to cool completely.


The sugar-coated edges should be golden
Once I had all the cookies cool, I made the small bags


I hope they taste as fresh tomorrow as they did today. Cookie-quest completed!

Sunday 4 December 2011

How to Make Friands, Coconut cookies and Rhubarb & vanilla jam

It's 22.49 and I have just sat down for the first time since 14.00 this afternoon when I first walked into the kitchen. This feels almost like a full-time job! And even though my back hurts badly I feel quite content with what I managed to do in just one day. Plan one for this weekend was to make Friands. Friands are small, light and almond-y cakes which are originally French, however, they're very popular in Australia and they are served in cafes (a coffee and a Friand after some surfing - that's the life!). They are becoming very popular here too due to the fact that the best London cafes are actually Antipodean. You will always see a rack with Friands (pear, blueberry, banana, you name it) on the counter of hipster cafes.

It's strange how I hadn't made them so far - probably I hadn't realised how easy they are to make.
The only downside is that you need a Friand tray but Muffin trays (or silicone cups) work too although the shape will turn out slightly different than what it's meant to. This is what I did.

In addition to baking those little guys, I cleared, tidied and organised my pantry and now I can actually find things that I look for and get stuff from the back of the shelf without clumsily spilling stuff like flour in the process.

pantry looking neat

BUT, most importantly, today I made four different cookie doughs. I will not expand on this in this post as the three of them are still being chilled in the fridge and will stay there overnight getting ready to be baked tomorrow. After baking them, I will put them in pretty bags and give them away as edible Christmas gifts. More on this very shortly!

I did bake one batch of Coconut cookies though and lastly, as if the above were not enough, I made a jar of Rhubarb and vanilla jam.

First the Friands:

The recipe is Australian - I wanted to use one from the country that actually brought them back in fashion and where they are being done best. The fruit can be anything you like. I used blueberries.

Friands

Ingredients for 6:

100 gr butter
4 large egg whites (minimun egg weight 59 gr each)
45 gr plain flour (not self-rising)
140 gr icing sugar, plus some extra for dusting
85 gr almond meal (or almond powder or very finely ground almonds)
about 40 gr blueberries

Method:

Preheat the oven to 170 degrees fan-forced.

Grease the friand tray or muffin tray/cases.

Melt the butter and let aside to cool until lukewarm.

In a bowl, beat the egg whites until foamy (about one minute, no need to overdo it, this is not meringue).

Stir the flour, icing sugar and almond meal into the bowl with the egg whites. Stir until just combined.

Add the melted butter to the bowl and stir until just combined.

Divide the mixture evenly among the friand / muffin holes of the tray (or silicon cases). Add a few (5-6) blueberries in a cluster in the centre of each friand.

Bake for about 25 minutes, or until the friands are a light golden colour and spring back when lightly pressed. You can always check also by inserting a toothpick into the centre of the cake: if it comes out without any raw-looking batter, then it's ready.

Remove friands and leave to cool in a rack. Dust with icing sugar and serve.

The friands just out of the oven


The biscuits in the background are crunchy coconut cookies and if you'd like to make them go ahead - they are incredibly easy. You can either toast the coconut under the grill first (about 5-10 minutes until it turns golden and watch out as it can darken very quickly) or skip the toasting which is what I did on this occasion.

Coconut Cookies

Ingredients:

1 cup desiccated coconut
140 g plain white flour
1/2 teaspoon baking powder
1/8 teaspoon sea salt
1/4 teaspoon ground cinnamon
85 g butter, at room temperature
90 g dark brown sugar
1 egg
1/2 teaspoon vanilla extract
1/4 teaspoon almond extract

Method:

Preheat the oven at 160 degrees and line two baking sheets with parchment paper.

Sift the flour, baking powder, salt and cinnamon into a bowl and set aside.

In a large bowl, using an electric mixer, beat the butter and brown sugar until smooth and fluffy (about 1 minute). Add the egg, vanilla and almond extracts and mix until just blended. On low speed, add the flour mix and mix until just incorporated. Stir in the coconut.

Scoop a spoonful of dough for each cookie, make it into a ball and place on the baking sheet. With the wet back of a spoon flatten the ball into round cookies. You can also use another method: Put the whole dough between two pieces of wax paper and roll it out with a rolling pin. Remove the top piece of wax paper and use a cookie cutter to make the cookies. Lift the cookies off the paper and transfer to the parchment lined baking sheet. If you are having trouble lifting the cookies, place the dough in the fridge for a while until it firms up.

Bake until the edges and bottoms are lightly browned, about 12 to 15 minutes. Leave to cool before lifting them from the baking sheet.


Also in the picture: Rhubarb and vanilla jam.
Now, the usual way to make jam is to use fruit and sugar on a 1 to 1 ratio. This is the traditionally sweet, victorian jam. If you prefer it to be fruitier, reduce the sugar according to your taste. I personally feel that with this ratio the fruitiness is overshadowed by the sweetness so after a few experiments I have found that my preferred ratio is 1 (fruit) to just under 3/4 (sugar).

Rhubarb and Vanilla Jam

Ingredients:

400 g rhubarb
250 g sugar
juice from one lemon
flesh from either one orange or two-three clementines.
One vanilla pod, split lengthwise.

Stir the first 4 ingredients in a pan under low heat. Scoop the seeds from the vanilla pod and stir in the pan both seeds and the pod.

Once the sugar is dissolved, raise to medium heat and bring to the boil. Once the jam has reached the rolling boiling point (the bubbles are big, staying longer and then bursting) remove from the heat and test. You can test if the jam is ready by scooping a spoonful on a cold plate (it's best to have it in the freezer before) and pushing the jam lightly with your finger. If it leaves a trail, it means it's set. If it's still liquid, boil a further few minutes and test again until it's set.

Remove the vanilla pod (at this point you can add some vanilla extract if you'd like) and pour the jam into sterilised jars.

Music playing in the background while I was making these:

Forrest Gump OST
Crazy Heart OST

many many times over and over

Mmm..tomorrow I'll have freshly-made jam to spread on my toast, not to mention friands for breakfast!

Good night everyone,
R.


Saturday 17 September 2011

Savoury Tarts

Surprise surprise, this blog is not dead yet!
It's been a bit inactive, for sure, but now that autumn is crawling in I'll cook and post more frequently.
It's been a busy summer and now it's being a busy September and this weekend is intended to be dedicated to relaxing. So today I thought I'd do some baking and started by making a savoury tart with feta, cherry tomatoes and olives. I had made this same tart a couple of months ago, only that the main ingredients of the filling were Swiss Chard and Gruyere instead and for a first attempt it had turned out to be a success!

On another note, I'd like to share with you a couple of finds. First of all, for those who live in London and like eating out in restaurants (I imagine most), I came across this blog in which the author reviews London restaurants and gives minutely detailed accounts of his visits and dishes. I was quite excited I discovered this because the author is quite clearly a pro (just read his guide to steaks. awesome!) and even though one can have a different opinion on some topics, it's professionally written and gives a great insight. All in all, I'd say it's a great guide and you can see most of London's most buzzed about restaurants featured on his list.

The second thing that got me excited this week is something for those who work around the area of Trafalgar square/ Covent Garden (or those who like going there): A relatively new cafe with one of the best-tasting coffees in town and an amazing atmosphere. The place is decorated in shabby chic style, it has a big bar with mirrors behind it bistro-like, a big communal table at the end of the room, a glass dome above it from where the light comes in, lovely friendly hipster staff (without being pushy though) and jazz music playing in the background. I was so excited to stumble on it as there is hardly a sophisticated place around the area where everything is mainly on the touristic side of things. Oh, I forgot to say that it's located on St Martin's lane, next to the Coliseum theatre and it's called Notes. And that they also have a collection of jazz and classical music CDs available for sale, as well as DVDs. Doesn't all that sound great? And the place has been there for almost a year without me knowing it..
Anyway, as well as being a cafe (fantastic flat white served there) and having some lunch dishes and pastries, in the evening it becomes a wine bar with a variety of cheeses and charcuterie available for accompanying.

Now back to the recipe and first the ingredients:

For the shortcrust pastry:
175 gr plain four
90 gr butter
about 2 tbs cold water
tin of 23cm diameter

For the filling:
You can use your imagination and customise the filling to your liking or mood so feel free to improvise combining your favourite ingredients and flavours.

2 eggs, lightly beaten
2/3 cup whole milk
salt & pepper
1 medium onion, sliced thin
2-3 tbs olive oil
180 gr crumbled feta
oregano or thyme
6 cherry tomatoes, halved
a handful of sliced olives
or, replace the last 5 ingredients with:
1 bunch of Swiss Chard, washed and patted dry
180 gr of any cheese like Gruyere or goat's

First I made the pastry by tipping the flour into a bowl and rubbing the butter with my fingertips. I added water to bind it to a soft dough and wrapped it in cling film and left it in the fridge to chill for half an hour.
Then I rolled out the pastry with a rolling pin on a lightly floured surface and lined the tin. I pricked the bottom of the pastry shell with a fork and then covered/lined the pastry shell with greaseproof paper and filled it with ceramic baking beans (otherwise the pastry will puff and will not remain flat).


Then I put the tin in the oven and baked it for 15-20 minutes at 220, removing the paper and beans for the last 10 minutes.


Then I started working on the filling, first by gently frying the onion in some olive oil until translucent.
Then, in a bowl, I combined the beaten eggs and milk, salt and pepper. I layered the onion on the bottom of the pastry base, then poured over it the egg/milk mixture and added the feta, cherry tomatoes and olives on top. I also sprinkled some oregano over. If you do this with Swiss Chard (or spinach or any other vegetable of this kind), you will need to saute it with the onions first.


This time I put some foil underneath my tin because my tin has a removable bottom and I've learnt my lesson well. This way, even if it drips, it has somewhere to go.

I baked it at 175-200 for about 30-40 minutes, until the tart started to get a golden colour and the custard was cooked.


And here is what I did while I waited for it to be baked. Although not as glamorous as having wine, I had had a glass or two every night the past 4 nights (consecutively...) so I thought I'd give my liver a rest.


Lastly, I'd like to show you something I'm proud of - proud because in the 3 weeks I've had it, it still hasn't shown any signs of dying - at all!! So it looks like I'm taking good care of it and I've been using it in cooking a lot. Now a fireplace may be an unlikely place for a pot of chilli peppers but I actually quite like it there. And speaking of chilli peppers, the Red Hot Chilli Peppers are coming to the UK in November as part of their tour and I'm REALLY looking forward to seeing them if I can. I've tried to buy tickets already via Ticketmaster but there seems to be some error as it won't let me. Perhaps sold out?I'll keep trying!


Sunday 17 July 2011

Baking on a rainy Sunday

Hello all!
I hope you like the new design of the blog, I spent a few hours yesterday trying out different things and this is the result. I personally like it more now, but think that it might be slightly harder to read and definitely harder to see the pictures as they kind of get lost in the background. Don't worry though as I'm sure I'll re-design it again sometime soon but for now please do tell me your opinion!

The whole day of today was spent baking as we're organising a charity bake sale at work tomorrow and since I was the one who suggested it I needed to make an effort. Also, the weather this weekend was beyond miserable with heavy rain pouring down and dark skies but  then again this is the ideal weather for staying in and baking! Part of the reason I'm being so positive though is that my much awaited summer holidays are approaching and I don't care if it's going to be raining, snowing or whatever else until then because in 3 weeks I'm off to bluer skies!

Back to the bake sale now, as tomorrow we're raising money to support Oxfam's appeal for East Africa and this is what I made to take with me tomorrow: Parmesan and rosemary biscuits, for those who fancy a savoury snack. Oatmeal cream pies, for an extra afternoon sugar rush. Goat's cheese and olive muffins, my personal favourite.

Making the parmesan & rosemary biscuits and the savoury muffins was very easy and quick but the oatmeal cream pies....that was tricky! I hadn't realised how difficult it is to spread the dough on the baking sheet without crumbling it (that alone took me more than an hour), how time-consuming baking the cookies in 3 batches is and then...making the swiss meringue! By the time I had everything pretty much assembled, the kitchen looked like a very big mess and I still had more to do.

I am sharing a couple of pics of my "products" and the tart I made yesterday for dinner.


Rosemary and Parmesan biscuits:

1 3/4 cup all purpose flour
1/2 tsp salt
1/4 tsp ground pepper
1 tsp baking powder
2 springs rosemary, chopped
3 1/2 tbs freshly grated parmesan
2 eggs
3 tbs unsalted butter, melted

Preheat the oven to 180 C. In the bowl of a mixer, combine the first six ingredients. In a separate bowl, whisk the eggs and the butter and add to the dry ingredients. Mix until combined.

Divide the dough into equal balls (whatever shape you like) and scoop on a baking sheet. Flatten with the back of a spoon or make them whatever shape you like. Place on the baking tray and bake for about 30 minutes, or until golden and dry.


Saturday 18 June 2011

Last bank holiday of May

And since I recently mentioned that I have a new dining table that I made myself, I'd like to share with you a pic or two. The actual table doesn't show very well and it's covered in plates and food but that's what it's meant to be used for, right? I took these a couple of weeks ago when our good friends Evi and Andre visited for the weekend and we made a couple of things to have as dinner. The menu consisted of:

-Portuguese cheese (oh dear, I forgot the name again!), charcuterie, red hot cherry peppers filled with ricotta, Poilane bread
-Steamed asparagus and smoked salmon with parmesan shavings and honey vinaigrette
-Crevette risotto with saffron and vegetables
-Tomato tarte
-Tarte Tatin for dessert
-Vinho verde


We had a lovely time and the weekend pretty much evolved around food and on the Sunday I had booked us a table at Providores for brunch. I was looking really forward to it as I had never been there before but I ended up slightly disappointed: The food was very good, but nothing that we haven't had before at Lantana and other places of more reasonable prices. The atmosphere downstairs was cozy and casual (but too crowded on that particular day, but that's what happens with popular places I guess) but we were seated upstairs were it was more fancy-restaurant-like and it lacked the hype vibe. We all made a great discovery though: Turkish baked eggs in yoghurt!! Even I, having had a longtime love-hate relationship with eggs, could not believe I hadn't tried this before, or didn't even know it existed.


I didn't take a photo of Evi's Turkish eggs but here is a pic I found on the internet:


We also went to Ginger and White (it almost sounds like I'm advertising the place) and had a coffee before going for a walk in the Heath. Here are some pictures from that day:


Oven-roasted king scallops

Today we woke up in a very energetic mode (despite the bad weather) and we jogged up to Hampstead village. It's so much more motivating than going to the gym and running on the treadmill, because you know that when you get there, there will be coffee waiting for you as a treat for your efforts. And so we had two flat whites at Ginger and White, waited for the rain to stop and walked back home again to make lunch (a very late one).

Here are some pictures I took (discreetly, I hope) at Ginger and White - one of my favourite coffee places:


Towards the end of the itinerary it started to rain again and we run through it, getting home soaked and tired. I didn't want to make something that would cancel our efforts and I was still thinking of a scallop dish I ate in Copenhagen while I was visiting for work last week. They were oven-roasted and had a pesto-like sauce but I decided to completely make something up - a sauce of my own creation:

I made a pesto-salsa verde hybrid by mixing garlic, pine nuts, basil, parsley, dill, lemon and olive oil.
Please don't ask me the measurements because I didn't actually measure, I just put all the ingredients together in the blender, in quantities that seemed fit to me. And so I blended them.

I cut about 10 vine tomatoes in half, put them cut side down in a baking tray and sprinkled with just a dash of olive oil. Then I roasted them in the oven for about 10-15 minutes.

Then I took a tablespoon or two of the green herb sauce and mixed it with some vine tomatoes (3-4) and blended these too (separately) to make a tomato sauce.

In the meantime, I took the tomatoes out of the oven and kept them aside. I seasoned the king scallops and put them in the oven for about 20 minutes. If you have a better/faster oven then mine, you might need less time.

After roasting the scallops I put them in a serving dish with some of the roasted tomatoes and sprinkled them with the green and the tomato sauce according to taste.

To accompany, I steamed some asparagus for 2 minutes, poured over them some vinaigrette and  parmesan shavings. I make the vinaigrette by mixing olive oil, balsamic vinegar and a teaspoon of honey.

Et voila, a light but tasty lunch


Wednesday 18 May 2011

Fried Tomato Balls and a new dining table

I have been away for so long I don't even remember when the last time was that I sat down to post something.
I had a few reasons though as there have been things going on - 2 bookfairs, Easter holidays, the usual busy schedule and some DIY that I have been doing recently! Yes, I realised one day that this flat needed some re-decoration and re-vamping but didn't want to spend a lot of money either. Besides, I had been looking for the ideal dining table and chairs all over and could not find what I wanted - so I made it myself (thanks to many design blogs which showed me how to). I was very worried in the beginning that things would not work out and I would end up throwing away to the bin the pieces of furniture I had bought (yes, cheap, but still..) and that I was just wasting my time making our flat look like a studio / lab. But in the end everything turned out very nice and now we actually have a decent table that doesn't wobble to eat on!
So, returning to a more relevant to this blog subject, a few weeks ago I made tomato fritters, or fried tomato balls , call them as you like. I tend to not use the frying pan very much as it's not the healthiest way of cooking, but some times you just need something fried and nothing else will do.  These tomato balls can be found on many of the Greek islands (and nowdays, the mainland too) and they are a great starter or mezze. The taste will depend a lot on the tomatoes, so they'd better be of a good quality, ripe and pretty. And you know what? they are suitable for vegetarians too!
Here is how I made them, following loosely Tesa Kiros' recipe:

300 gr ripe red tomatoes
70 gr red onion, chopped
3 tbsp chopped parsley
100 gr plain flour
1 tsp baking powder
olive oil, for frying

Slice the tomatoes into 6 wedges, then chop each wedge into 4 pieces.
Scrape off the board where you were chopping the tomatoes into a bowl but leave behind any excess juice. Add the onion, parsley and half the flour to the bowl and season with salt and pepper.


Leave for 10 minutes or so to soften
Now make a paste with the remaining flour, the baking powder and 80 ml (1/3 cup) of water.


Add this paste to the bowl and mix in well.
Heat a generous amount of olive oil in the frying pan until very hot. Scoop up a good tablespoon of the mixture and with another spoon, scrape this into the hot olive oil in irregular fritters. Fry a few at a time and turn them over when golden to fry the other side.

as the tomato fritters were being fried - a view from the kitchen window


frying the tomato balls in irregular fritters

Remove with a slotted spoon and drain on a plate with kitchen paper. Serve them on a clean plate.


You might want to add mint when you make the batter, to give it a zingy flavour but parsley is definitely a winner!